
Stripe Payments
Configure Stripe to collect payments through your GenZform forms — connect your account with API keys, and optionally set up a webhook so submissions are confirmed only after a successful payment.
Connect Stripe to your form to collect payments before the submission is finalized. GenZform handles the payment intent on your behalf using your Stripe publishable key and a scoped restricted key. You can optionally add a webhook — verified with the webhook's signing secret — so the submission is marked paid only after Stripe confirms the charge succeeded.
You need a Stripe account to use this integration.
What You'll Need
- A Stripe account (sign up free if you don't have one)
- Access to your form's design page in GenZform
- About 5 minutes
How It Works
- You paste your Stripe publishable key and a Stripe restricted key into the form's Customize panel.
- When someone submits the form, GenZform creates a Stripe payment and the user pays.
- (Optional) You enable the Webhook toggle and paste the webhook's signing secret back into GenZform. Stripe then pings GenZform after the charge so the submission is marked paid only once the payment is confirmed.
Only the publishable key and restricted key are required to enable payment collection. The webhook is optional — but if you set one up, the signing secret is required so GenZform can verify the requests really came from Stripe.
How to Configure Stripe
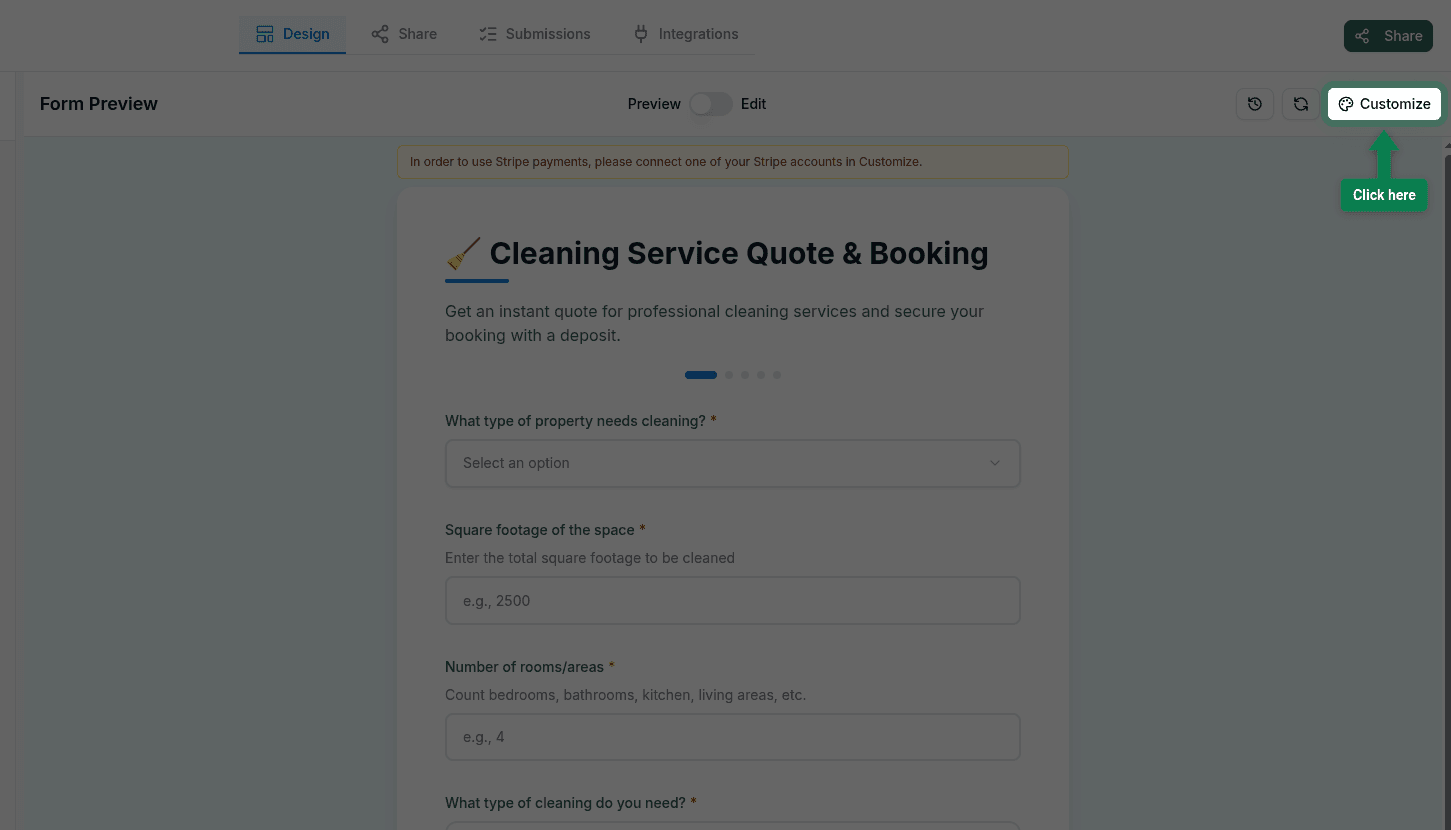
Open your form and click Customize
Open the form you want to add payments to. On the Design tab, click the Customize button in the top right of the preview area.
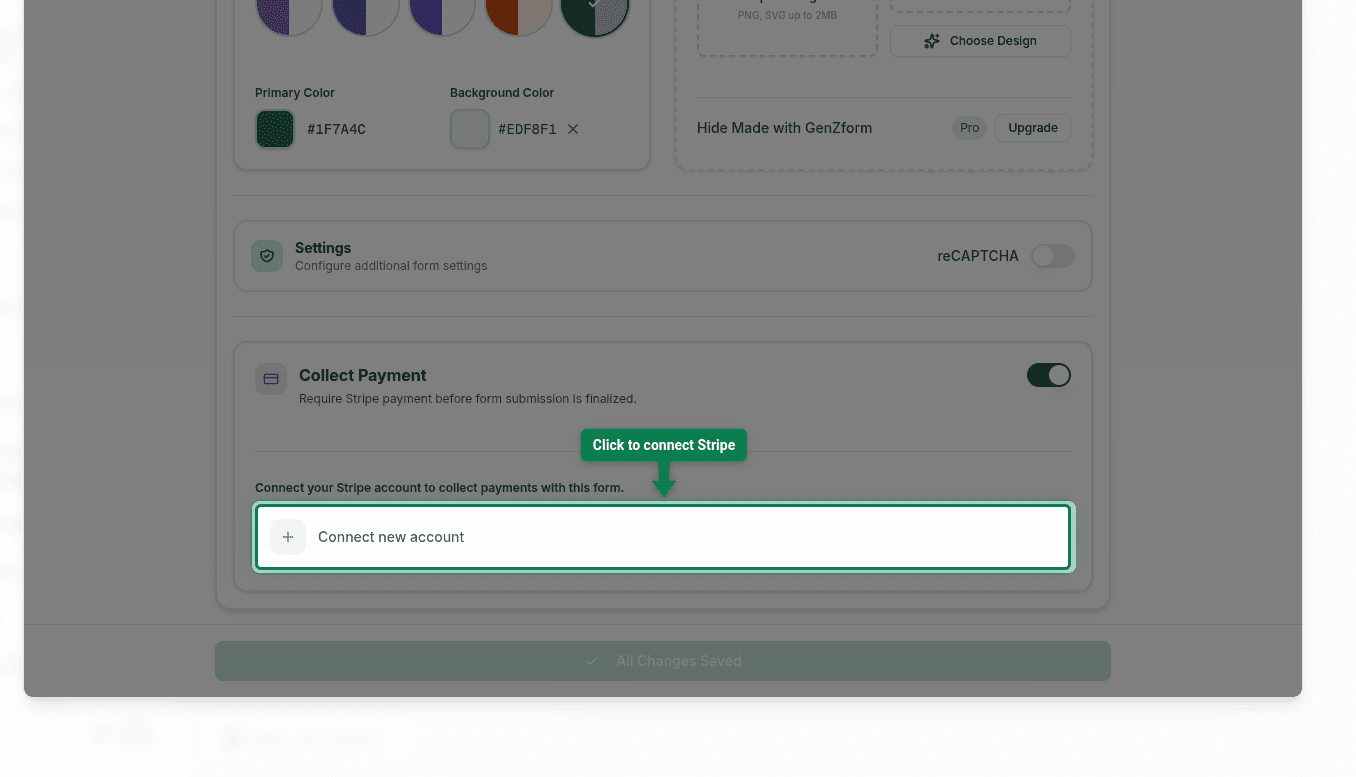
Click Connect new account
In the Customize panel, scroll to the Collect Payment section. Make sure the toggle on the right is on, then click Connect new account.
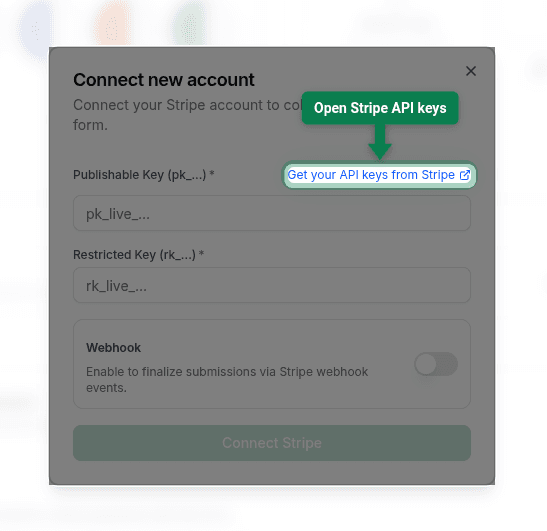
Open the Stripe API keys page
The Connect new account modal opens. Click the Get your API keys from Stripe link next to the Publishable Key field — this opens the Stripe API keys page in a new tab.
Copy your Stripe publishable key
On the Stripe API keys page, find the Standard keys section and click the Publishable key value (pk_live_…) to copy it.

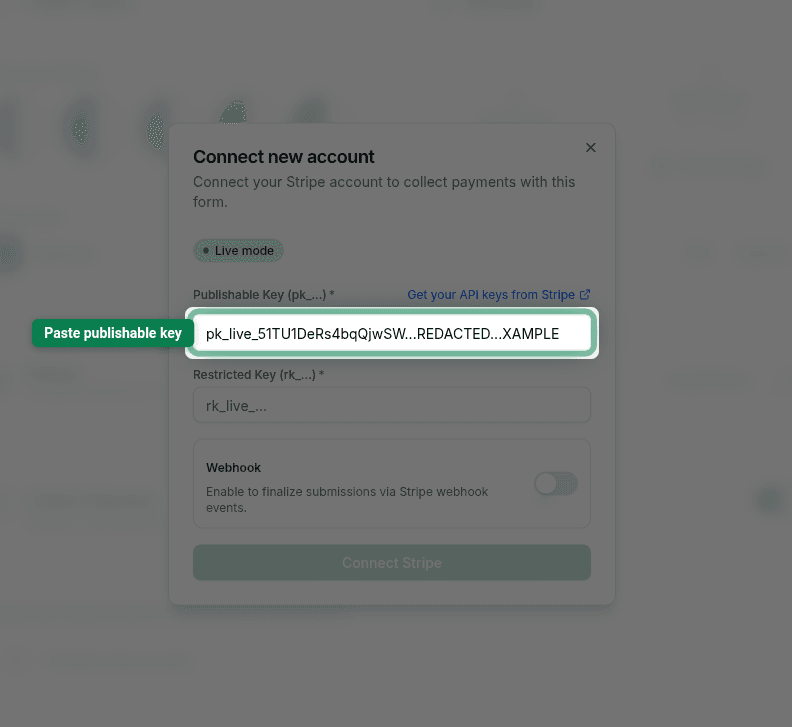
Paste the publishable key into GenZform
Switch back to the GenZform tab and paste the publishable key into the Publishable Key (pk_…) field in the Connect new account modal.
Switch back to Stripe and create a restricted key
Return to the Stripe API keys tab. Scroll up to the Restricted keys section and click + Create restricted key.
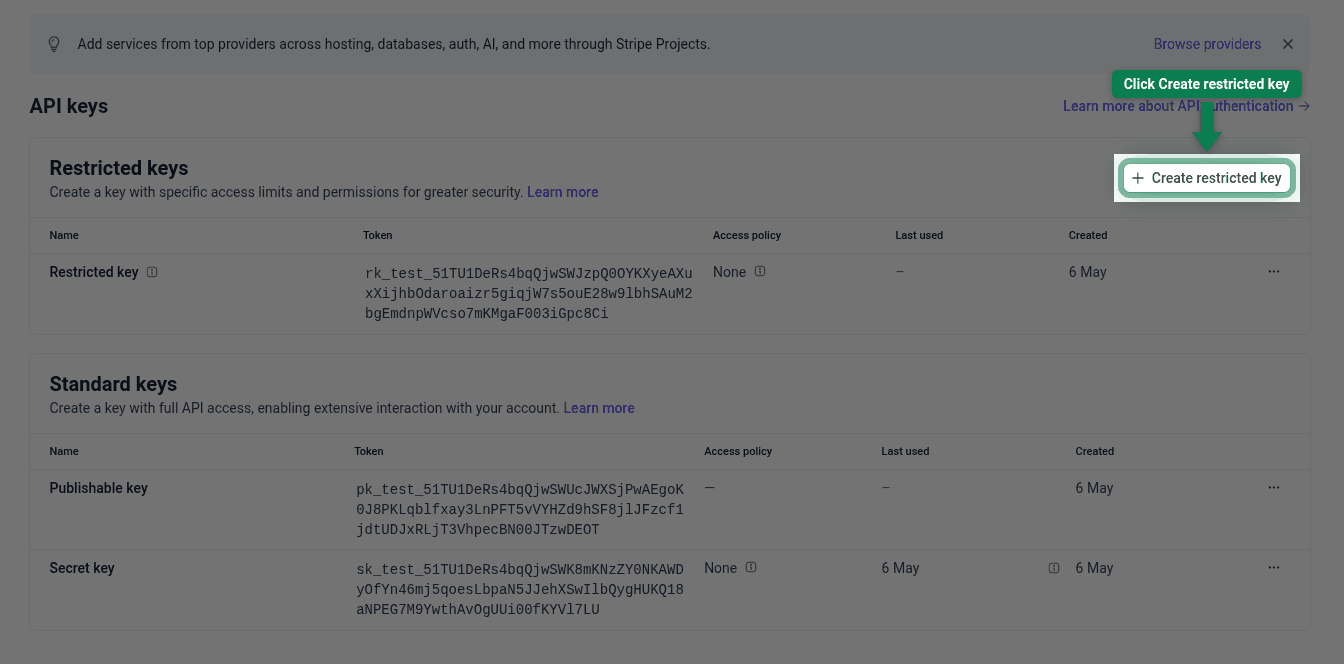
GenZform asks for a restricted key (rk_…) — not a secret key (sk_…) — so a leaked key can't be used to read your customers, refund payments, or access any other part of your Stripe account.
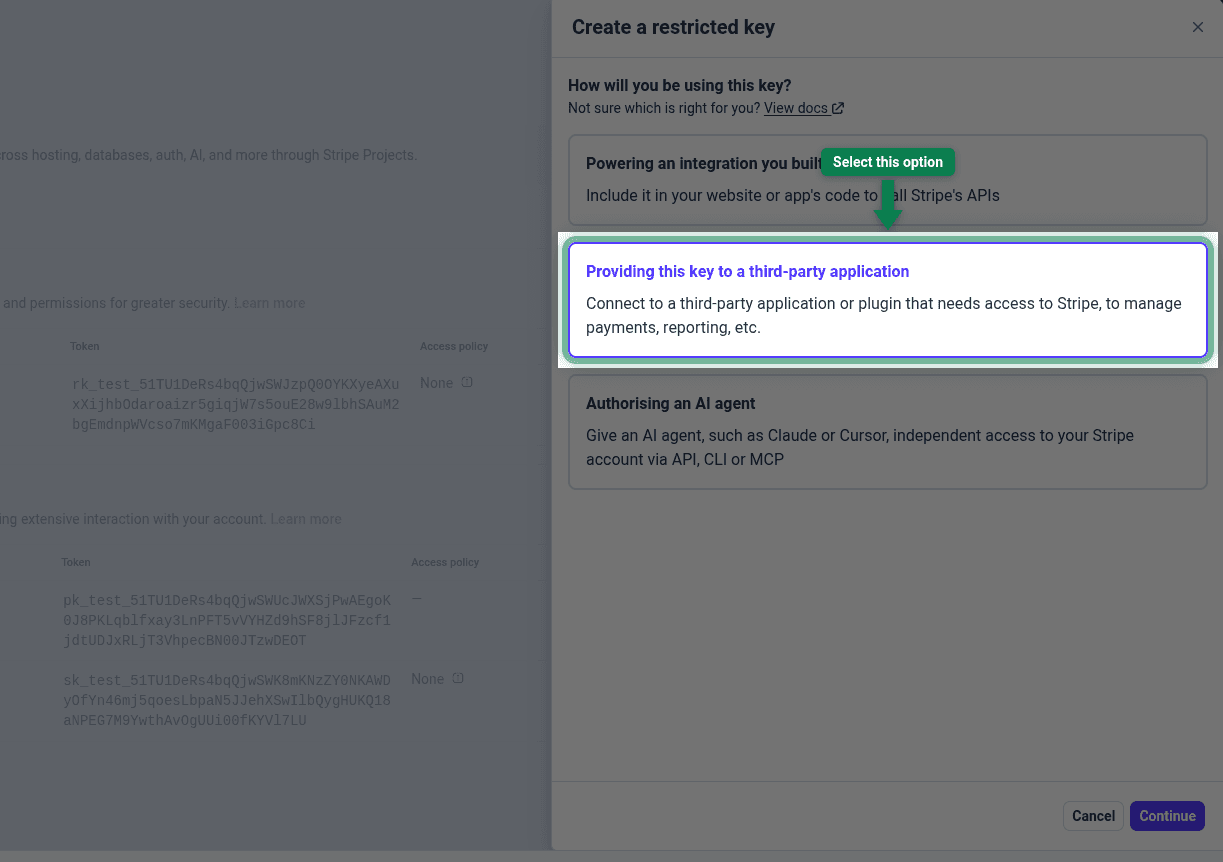
Choose 'Providing this key to a third-party application'
A side panel opens asking how you'll use the key. Select Providing this key to a third-party application and click Continue.
Enter the product details
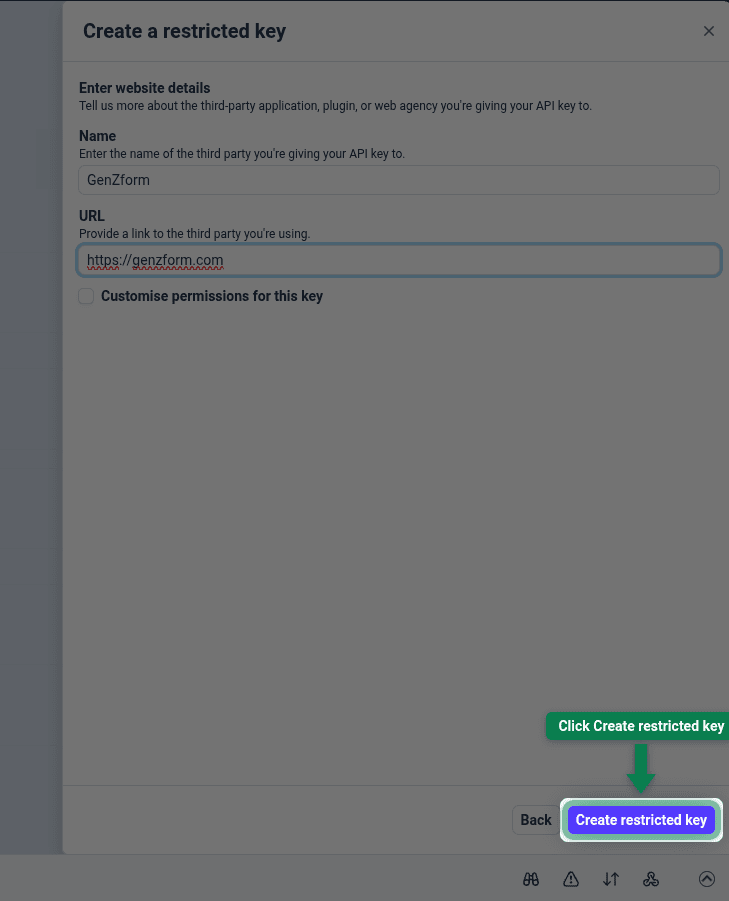
On the next step:
- Name — enter
GenZform - URL — enter
https://genzform.com
Then click Create restricted key.
Copy the new restricted key
Stripe creates the key and adds it to your Restricted keys list. Click the new key's row (it'll start with rk_live_…) to copy the value.

Treat your restricted key like a password. Stripe only shows the full value while you're on this page — copy it now and paste it into GenZform straight away. GenZform stores it encrypted.
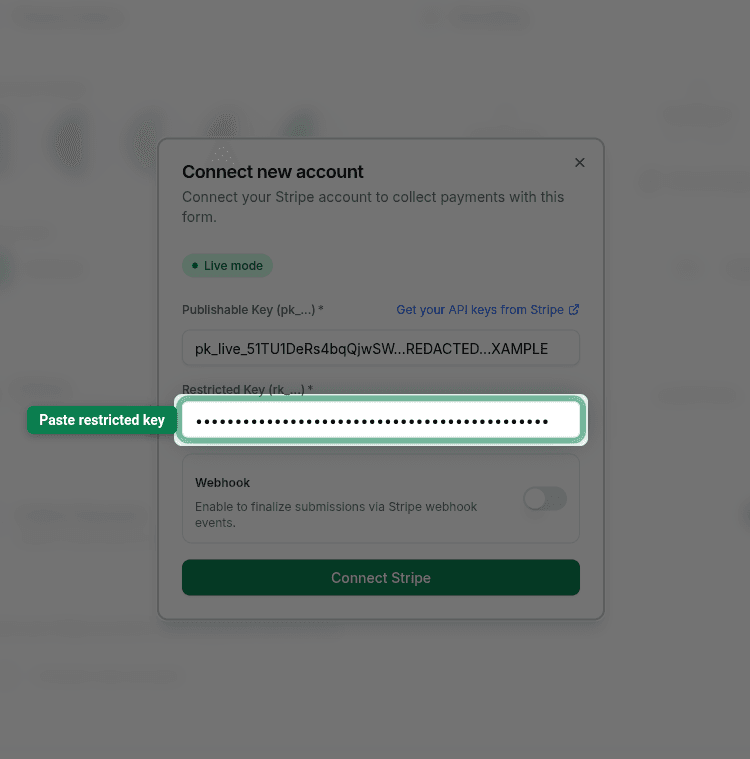
Paste the restricted key into GenZform
Switch back to the GenZform tab and paste the restricted key into the Restricted Key (rk_…) field.
Set the payment amount
Once Stripe is connected, an Amount field appears in the Collect Payment section. Enter how much to charge per submission and pick the unit (cents or dollars) from the dropdown next to it.
You can either type a fixed number or reference a dynamic variable that comes from the form data.
Option 1 — Fixed amount
Type a static number. For example, to charge $50 for every submission:
Amount: 50
Unit:   dollars
Or the equivalent in cents (Stripe's smallest currency unit):
Amount: 5000
Unit:   cents
The preview below the field confirms the conversion (= 5000 cents when the unit is dollars, or = $50.00 when the unit is cents).

Option 2 — Dynamic amount from a form variable
For dynamic pricing — calculator forms, quizzes, or anything where the price depends on what the user picks — use the AI Chat in the form editor instead of typing the variable yourself.
Ask the AI Chat to wire this up. Open the AI Chat panel and say something like "Charge the deposit_amount as the Stripe amount" or "Set the payment to the calculator total". The AI already knows every field ID, calculator output, and custom variable in your form, so it picks the right reference and inserts it for you. Manually typing {{variable_name}} is error-prone — a typo silently sends the user through without a charge, or charges the wrong amount.
Under the hood, the AI Chat fills the Amount field with a value wrapped in double curly braces, e.g. {{total_calculated_amount}}:

The variable is resolved at submission time using the values the user entered. If the resolved value is 0 or empty, the payment step is skipped and the submission goes through as a regular response.
Stripe charges in the smallest currency unit. If you set the unit to cents, an amount of 100 charges $1.00, not $100. Double-check the preview line under the field before testing.
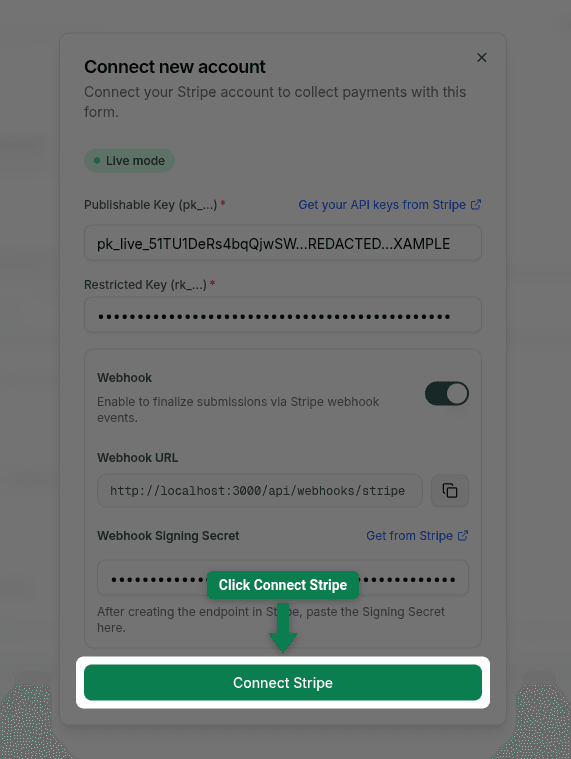
Click Connect Stripe
Click Connect Stripe at the bottom of the modal. The account is saved and automatically connected to this form. Hit Save Changes in the Customize panel to finish.
Want submissions to be confirmed only after Stripe verifies the charge succeeded? Continue to Set Up the Stripe Webhook below.
Set Up the Stripe Webhook (Optional)
A webhook lets Stripe notify GenZform after a charge succeeds, fails, or is canceled — so the submission is marked paid, failed, or canceled based on the real Stripe outcome instead of staying in pending. This is optional but recommended. Without it, payments still go through, but GenZform won't get a confirmation back from Stripe.
Each form needs its own webhook destination in Stripe (because the URL contains the form ID) and therefore its own signing secret. If you reuse the same Stripe account across multiple forms, repeat this section for each form.
Enable the webhook in GenZform
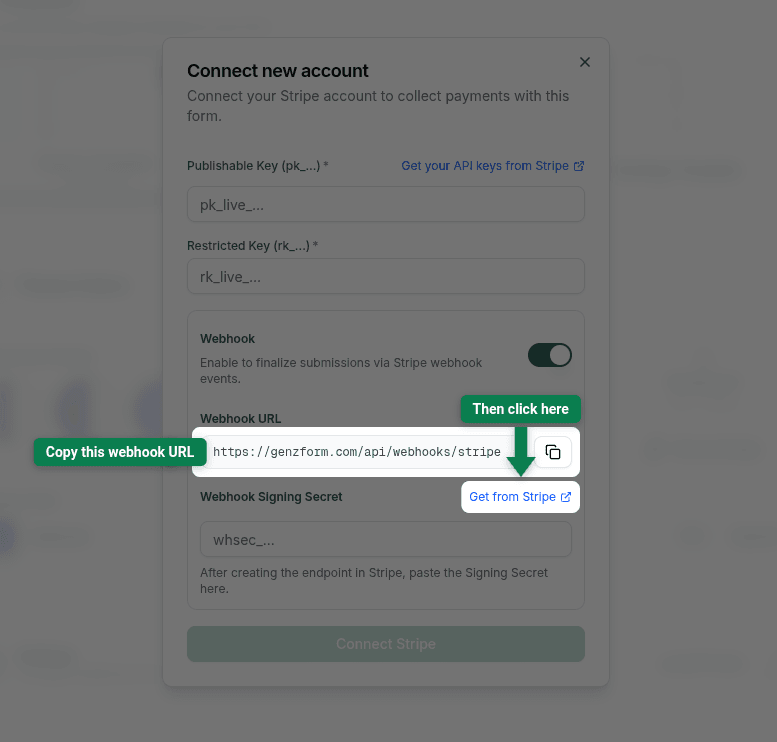
Reopen the Connect new account modal (or open the existing connection's settings) in the Collect Payment section of the Customize panel. Toggle the Webhook switch on. A Webhook URL and a Get from Stripe link appear underneath. Copy the Webhook URL (you'll need it in a moment) and click Get from Stripe — that link opens Stripe's Webhooks page in a new tab.
Add a destination in Stripe
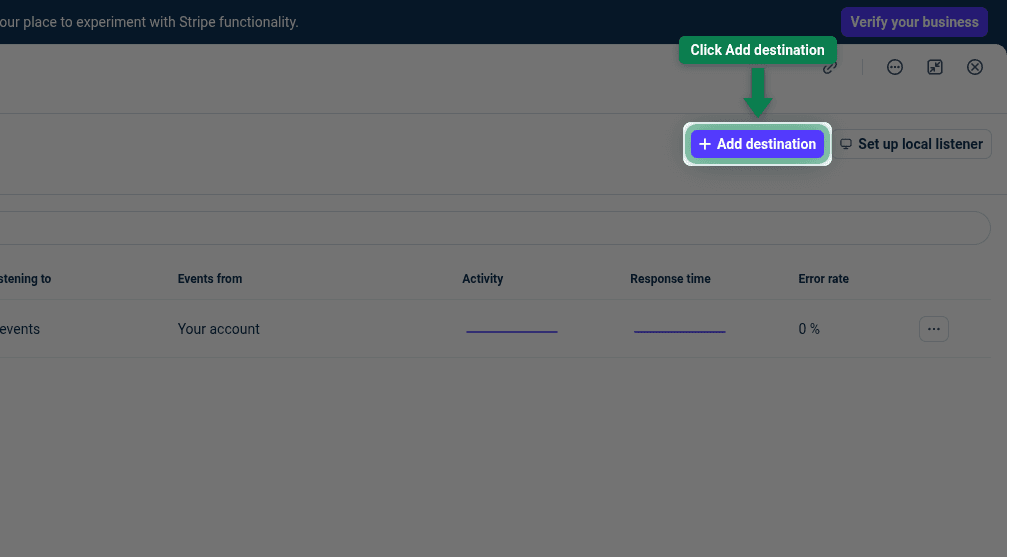
On the Stripe Webhooks page, click + Add destination.
Select the three payment events
Type payment_intent in the search box and tick the checkboxes for:
payment_intent.succeededpayment_intent.payment_failedpayment_intent.canceled
Then click Continue.
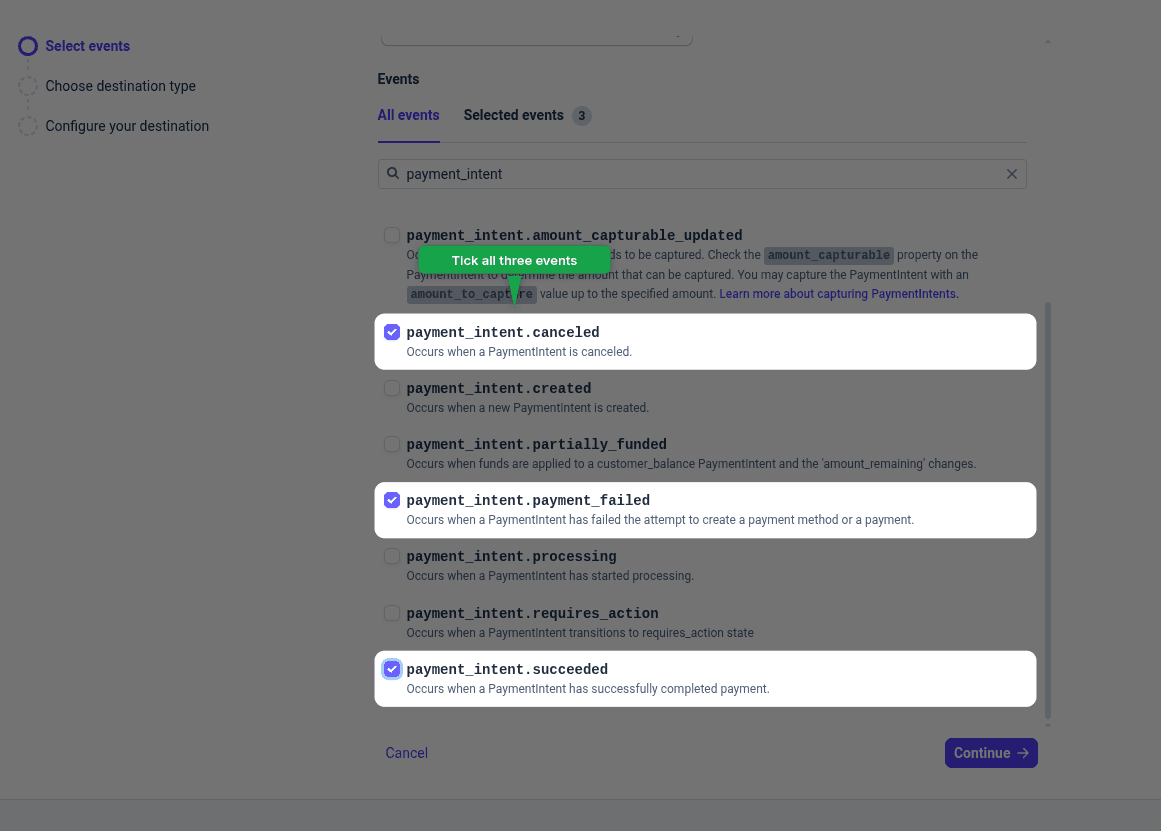
These are the only three events GenZform listens for. Picking more won't break anything but isn't necessary.
Choose Webhook endpoint as the destination type
On the Choose destination type step, leave Webhook endpoint selected (it's the default) and click Continue.
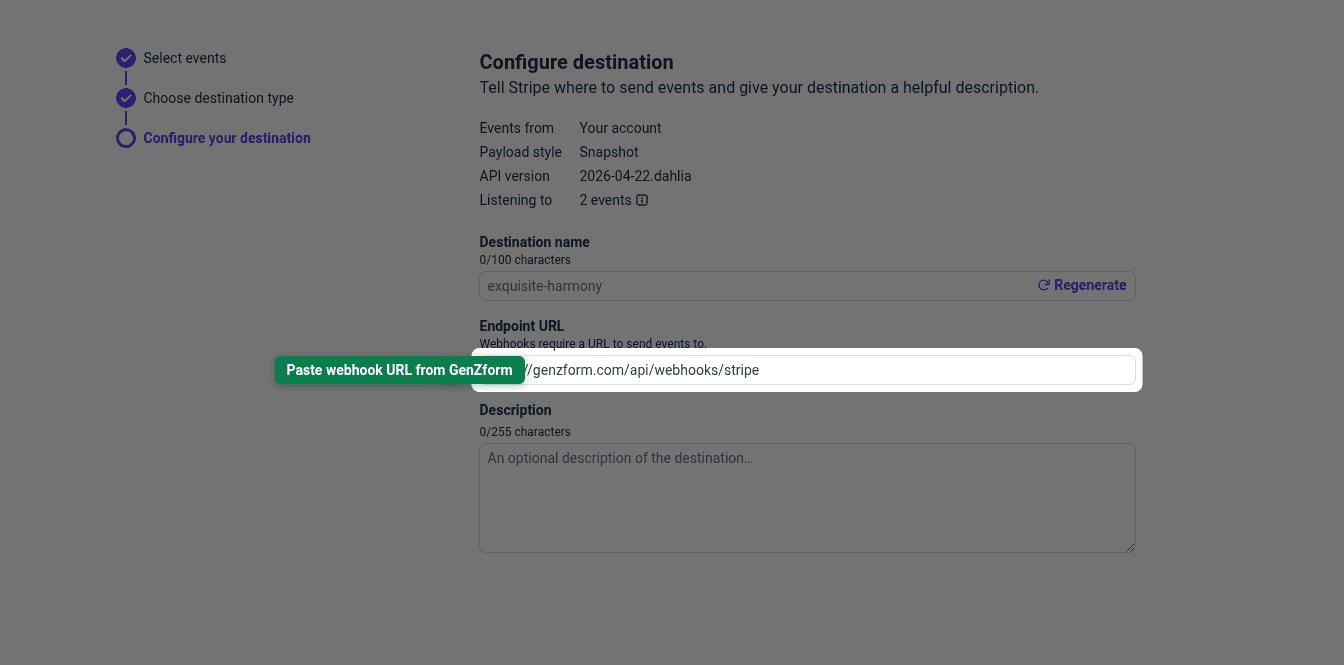
Paste your GenZform webhook URL
In the Endpoint URL field, paste the webhook URL you copied from GenZform in step 1. Then click Create destination.
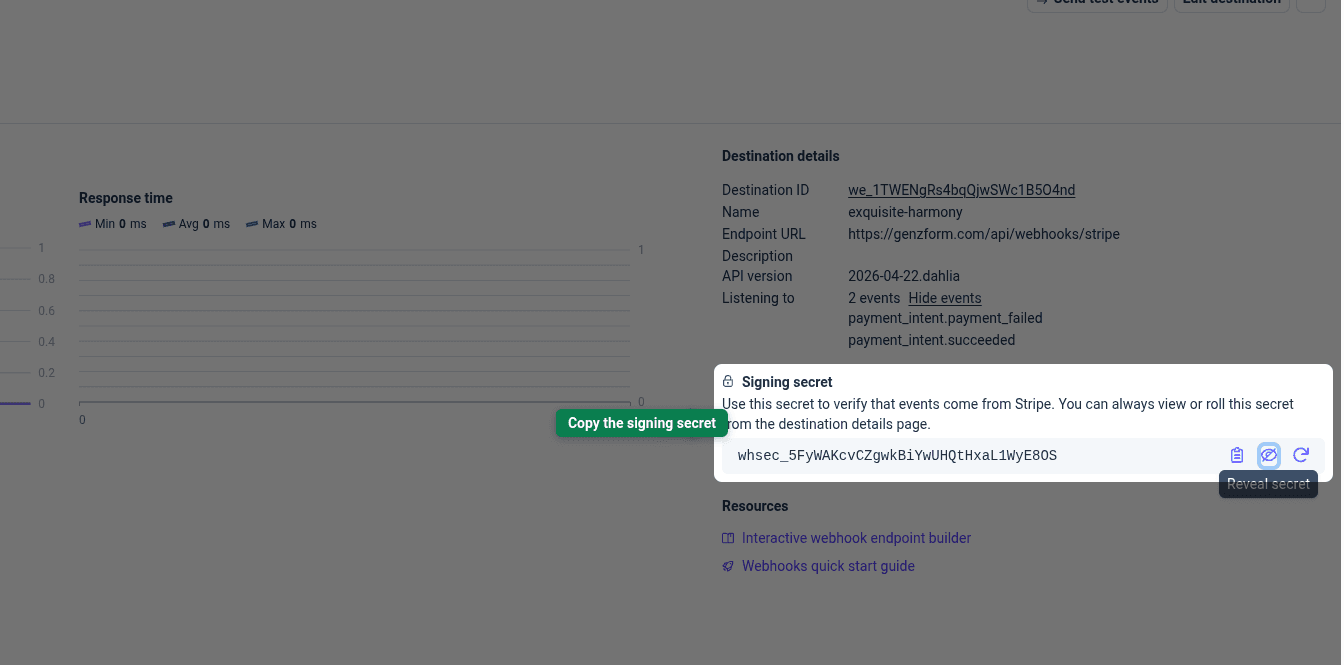
Reveal and copy the signing secret
Stripe creates the destination and shows its details. Find the Signing secret card on the right side of the page, click the Reveal secret icon, and copy the value (it starts with whsec_…).
Paste the signing secret into GenZform
Switch back to the GenZform tab and paste the whsec_… value into the Webhook Signing Secret field.
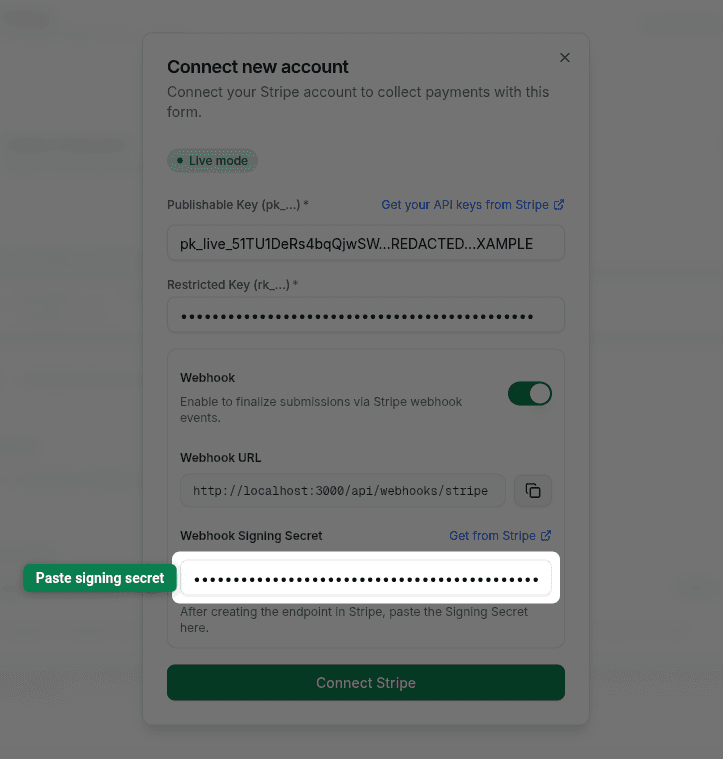
If the webhook is enabled, the signing secret is required — GenZform uses it to verify that incoming webhook calls really came from Stripe. To skip webhooks entirely, turn the Webhook toggle off instead of leaving the secret empty.
Click Connect Stripe
Click Connect Stripe at the bottom of the modal to save the webhook settings. Then hit Save Changes in the Customize panel to finish.
Test Your Setup
If you want to verify the flow without charging a real card, you can temporarily set up the same keys and webhook in Stripe's test mode (pk_test_…, rk_test_…, and a test-mode webhook with its own whsec_…) and use one of Stripe's test cards on the public form:
- Success:
4242 4242 4242 4242, any future expiry, any CVC, any postal code - Decline:
4000 0000 0000 0002
For the full list of test card numbers covering other brands, 3D Secure flows, and specific decline reasons, see Stripe's Testing documentation.
After submitting, check your form's Submissions tab — successful payments are marked paid, declined ones failed. Once you're satisfied, swap the test keys and signing secret back to the live values.
The live and test environments in Stripe are completely separate — keys, webhooks, and signing secrets don't carry over between them.
If a submission is stuck in pending, the webhook didn't reach GenZform — check the troubleshooting section below.
Troubleshooting
The submission stays in 'pending' and never marks as paid.
Stripe sent the webhook but GenZform either didn't receive it or rejected it. Check that:
- The Endpoint URL in Stripe matches the Webhook URL shown in GenZform's Customize panel exactly.
- All three of
payment_intent.succeeded,payment_intent.payment_failed, andpayment_intent.canceledare selected on the destination. - The Webhook Signing Secret saved in the form matches the signing secret shown on this destination in Stripe. If you recreated the destination, the secret changed and you must paste the new one.
- In Stripe, open the destination and check the Event deliveries tab — failed deliveries show the response GenZform returned (e.g. Webhook signature verification failed), which usually pinpoints the issue.
Can I use one Stripe account across multiple forms?
Yes. You can reuse the same publishable key and restricted key across every form on your account. However, each form needs its own webhook destination in Stripe (because the URL contains the form ID) and therefore its own signing secret, which you paste into that form's Webhook Signing Secret field.
What happens if a customer's card is declined?
Stripe sends payment_intent.payment_failed and GenZform marks the submission as failed. The customer sees the failure thank-you state and can retry without losing the form data they already entered.
What happens if the customer abandons or cancels the payment?
Stripe sends payment_intent.canceled and GenZform marks the submission as canceled — for example, when a customer closes the checkout without completing the payment, or when a pending payment is canceled in Stripe. This keeps your submissions tab accurate so canceled attempts don't sit around as "pending" forever.
Where do I see the actual money?
Payments land in your Stripe account, not GenZform. Check the Payments section of your Stripe dashboard for charges, refunds, and payouts.
Do I need the signing secret (`whsec_…`)?
Only if the Webhook toggle is on. Payment collection works with just the publishable and restricted keys. But if you do enable the webhook, the signing secret is required — GenZform uses it to verify that incoming events really came from Stripe.
Each webhook destination in Stripe has its own signing secret, so if you create destinations for multiple forms you need to paste each form's matching secret into that form's Webhook Signing Secret field.
Why does GenZform ask for a restricted key instead of a secret key?
A restricted key (rk_…) limits what GenZform can do in your Stripe account to just the operations the integration needs. A leaked restricted key cannot be used to read your customers, issue refunds, or access any other part of your account. Stripe itself recommends restricted keys for third-party integrations.
Can I charge a different amount based on what the user picks?
Yes — and the easiest way is to ask the AI Chat in the form editor to wire it up. Tell it something like "Charge the calculator total as the Stripe amount" and it'll insert the correct variable reference into the Amount field for you. The AI knows every field and calculator output in your form, so it won't pick the wrong name or miss a typo. Manual {{variable_name}} entry still works, but it's easy to get wrong.
Should I enter the amount in cents or dollars?
Either works — pick whichever is easier. The unit dropdown next to the amount field controls how it's interpreted, and a preview line below shows the conversion (e.g. 100 cents = $1.00). Internally Stripe always charges in the smallest currency unit (cents for USD), but GenZform handles the conversion for you.